Tuesday, December 20, 2011

Great Deal of the Day


8 pairs of jeans and 5 shirts $17.15 @ Salvation Army. This includes 2 pairs of Mudd jeans, 1 pair of Limited Too, 2 pairs of Old Navy jeans and 3 other jeans. All the clothes are in like new condition and one pair of Mudd jeans still had the original tags on them and I paid $0.99 for them.

Saturday, December 10, 2011

Organizing Your DVDs


If you're like most people you have more DVDs than you know what to do with and no matter what storage you buy it never appears organized so I decided to have my movies organized and out of the way and even have a way to see quickly what I have.

I keep my DVDs in a CD case. This one holds 200 I believe. We have so many movies we have 2 of these almost full. That is almost 400 DVDs in less space than our Direct TV receiver.

Then in the front of each I keep 2 list of all the movies each organized a different way, one alphabetically by name and the other by category, but both have both listed so if I find a movie on the alphabetical list I can look in the next column to see what category it's in, on the category list the movies are alphabetical under each category title. Then in the CD case I have the movies organized by category (with 4 empty slots as I get new movies) and use self adhesive tabs (Walmart $0.89/20) to label the category.


Hope this helps!

Friday, December 9, 2011

URL Review: My Body Gallery

Women have such distorted views of what they look like. Here is a neat site where you can enter your stats and see other women that have the same so you can see what you really look like. I did it and the pictures I saw made me realize I don't look as bad as I think.

My Body Gallery

Organizing Your Laundry Detergent

My laundry room is VERY small, you can see most of it in the picture at the left (I even had to stack my washer & dryer to have room). I needed a place to store my detergents, fabric softeners, and other laundry related items so I figured since I didn't have room to go out I would go UP!

I used a get small shelves and shelving system (all together I think it cost me about $20 at Ace). Grouped things by size and placed the shelves accordingly. I brought in a Glad bowl to hold change found in pockets and used the top shelf for the least used items.

If you don't use as many different laundry items as I do, you can use these shelves for lesser used items from your kitchen like that crock-pot or waffle iron.

Hope this helps!

Thursday, December 8, 2011

Creating Extra Pantry Storage


Here's a quick and easy idea to give you lots of extra pantry storage, and easy access to some of the smaller things in your pantry. Use a shoe door organizer. I use mine to hold drink mixes, oatmeal, hot chocolate, cupcake wrappers, and pop tarts. Since the pockets are see through you can get to what you need quickly. I recommend the mesh ones as opposed to the plastic as the plastic ones can rip easily.

Hope this helps!

Wednesday, December 7, 2011

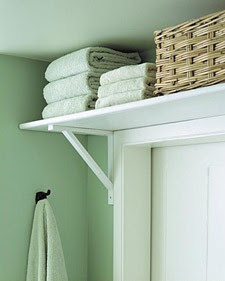
Above Door Shelf

I ran across this idea when looking for some inspiration for the remainder of the month and just had to share it with you today.

For smaller bathrooms and smaller rooms in general, hang a shelf above the door for some extra storage. I think I will be doing this in my bathrooms. :) It gives you space for extra towels or a couple baskets to put some of those lesser used items.


Hope this helps! And remember an organized home is a happy home. :)

Tuesday, December 6, 2011

Magic Tub & Shower Cleaner

Can't be Organized if you're not Clean!

Ingredients:

  • 12 ounces white vinegar
  • 12 ounces liquid, blue dawn detergent

Directions:

  1. Heat vinegar in microwave until hot and pour into squirt bottle.
  2. Add the Dawn soap. Put the lid on and gently shake to incorporate.
  3. You now have a powerful cleaning product that will melt soap scum and tub and shower buildup, clean sinks, appliances and just about anything. Just spray it on, scrub, rinse and be amazed. For tough soap scum build-up, spray the mixture on and allow it to sit as long as overnight. Then, scrub and rinse.

Monday, December 5, 2011

Organizing Your Spices

I have my spices organized in Swivel Store organizers but realize not everyone wants to pay the price for them so here is another idea. Baby food jars. wash & dry them and pour your spices in and then label the tops. You can line a shallow drawer with them or even label the sides and stack them in your cabinets. This allows you to not only have things organized but you can buy cheaper 'refill' packs of spices in packets and will have a place to store them. Since my spices are organized, I decided to use the baby food jars for my colored sugars and sprinkles.


A Lighter Lasagna Soup

404 less calories than original
28 g less fat than original

100% of the taste of the original

Ingredients:

2 teaspoons olive oil
1 pound Italian turkey sausage, casings removed
1 onion, chopped
1 green bell pepper, chopped
3 cloves garlic, minced
1 (32-ounce) container chicken broth
1 (15-ounce) can tomato sauce
1 (14 1/2-ounce) can petite diced tomatoes
1/2 teaspoon salt
1/4 teaspoon crushed red pepper
4 ounces broken whole-wheat lasagna noodles (about 4 noodles)
1/2 cup chopped fresh basil
3 tablespoons grated Parmesan cheese
1/2 cup reduced-fat shredded mozzarella cheese
8 Whole-wheat bread sticks or grissini (optional)

Instructions:

Heat the oil over medium-high heat in a large nonstick saucepot or Dutch oven. Add the sausage, onion, bell pepper, and garlic. Cook over medium-high heat, stirring occasionally, until the sausage is crumbled and browned, 8 – 10 minutes.

Add the broth, tomato sauce, diced tomatoes, salt, and crushed red pepper. Bring to a boil. Reduce the heat and simmer, stirring occasionally, until the flavors are blended, about 20 minutes. Add the noodles; bring to a boil. Reduce the heat and simmer, uncovered, stirring occasionally, until the soup thickens slightly and the noodles are tender, 10 – 12 minutes. Remove from the heat; stir in mozzarella, basil, and the Parmesan. Serve with the bread sticks, if using. (whole-wheat lasagna noodles take a little longer to cook.)

Nutritional Information:

Per Serving (1 cup) 225 Cal (27% from Fat, 42% from Protein, 31% from Carb); 23 g Protein; 7 g Tot Fat; 2 g Sat Fat; 2 g Mono Fat; 17 g Carb; 2 g Fiber; 4 g Sugar; 108 mg Calcium; 3 mg Iron; 826 mg Sodium; 53 mg Cholesterol

Original Recipe by Paula Deen: Tastes Like Lasagna Soup
Take It Lighter recipe courtesy of Bobby and Jamie Deen, and the Paula Deen Test Kitchen

Servings: 8 cups
Prep Time: 5 min
Cook Time: 1 hour
Difficulty: Easy

Sheep Cupcakes

This is my 30 second attempt at a sheep cupcake. The face would look better made of fondant but I decided to try and use icing. :P

Sunday, December 4, 2011

Chocolate Chip Cheesecake Dip

I wish I could claim this yummy recipe as my own, but I cannot. It is however just as amazing as the original author claims it to be:

"This dip might put me into rehab. It is so addicting. I couldn’t get a grip. I kept telling myself I needed to stop, but apparently my hand and mouth had a different plan." ~Original Poster


Ingredients:

  • 8 ounces cream cheese, softened
  • 1/2 cup unsalted butter, softened
  • 3/4 cup powdered sugar
  • 2 tablespoons brown sugar
  • 1 teaspoon vanilla
  • 1 cup miniature chocolate chips
  • Graham cracker sticks or teddy grahams

Directions:

  1. In a small bowl, beat together cream cheese and butter until smooth.
  2. Add sugars and vanilla. Stir in chocolate chips.
  3. Refrigerate until ready to eat.
  4. Serve with graham cracker sticks or teddy grahams

Apple Cupcakes


Super simple, but super cute. Choose your favorite cake mix & icing (as long as the icing is white or pink, chocolate won't work). Make your cupcakes, but first check out my The Perfect Cupcake post and you'll see how to make a cupcake with a nice round top. Cool & ice them and then roll in the red sugar you made. Use a piece of a pretzel stick on the top & either a fondant leaf (as I did) or you can use a fresh mint leaf.

Fake-It Colored Sugar


I can't count how many times I have wanted colored sugar and when I've gone to the store they didn't have the color I wanted or it was $2-$3 for a small shaker of it. Well now you can make your own.

white sugar
liquid food coloring
air tight container

Put the sugar and 2-3 drops of the food coloring in the container and shake until well mixed. Keep adding 2-3 drops at a time until you get the desired color. If you add too much at once you will get a large clump in the center. If you need a lot to get the desired color use a cookie sheet and parchment paper/wax paper to lay the sugar out to dry, if you have some clumps, use the back of a spoon to mash them out and mix them in. Store back in the containers.


Fake-It Cost Breakdown:

Fake Colored Sugar ($0.15/cup of sugar and a couple drops of food coloring is like $0.005)

Total Fake-It Cost: $0.15

Compare to Colored Sugar $3.00/8 oz (8oz=1c.)

Total Fake-It Savings: $2.85 Each Color

Organizing Your Cup Cabinet

Since its Sunday I thought I would do a quick and easy fix that doesn't cost anything (well 3 cup hooks, but a package of 20 is $0.97). I don't use coffee cups much so figured up & out of the way was best (I even only own 3). The best option is use the most used cups at eye level and then increase height as the frequency decreases. :)

BEFORE


AFTER

Hope this helps and you have a wonderful Sunday.

*No worries, you're not getting gypped today, I will have a couple more posts later of some fun recipes I am testing out at the moment.

Saturday, December 3, 2011

Homemade Mini Poptarts


FOR THE POPTARTS
~ Cherry/Strawberry pie filling (but only the gel, not the cherries/strawberries)
~ 1 pkg. prepared pie crusts

FOR THE GLAZE
~ 1 c. powdered sugar
~ 1 T. milk
~ 1/2 tsp. vanilla
~ food coloring and sugar sprinkles (optional)


 Unroll pie crusts and using a pizza cutter to slice them into 2 1/4″x 3″ rectangles (I used a piece of card stock cut to size).


Spoon some of the filling gel into the center of the pie square, taking care not to get it near the edges. Gently lay a second rectangle over the top of the filling. Press the edges of the rectangles together with a fork. Transfer to a baking sheet. Bake poptart pops in an oven preheated to 350 degrees for 8-10 minutes, or just until the edges begin to brown.

In a small bowl, combine powdered sugar, milk, and vanilla to make glaze. Tint with food coloring, if desired. Spoon over cooled poptarts, sprinkle with colored sugar, and allow the glaze to harden slightly before serving. (I was too anxious and didn't let them cool all the way so the icing ran a bit.) I left some without icing as DH doesn't like iced poptarts.
Enjoy!
Note: You can also adapt this recipe to make home made poptarts. Just increase the size of the rectangles and for some more substance, blend/mash the strawberries/cherries to have little bits inside.

Organizing the Fridge Front


This is what my fridge front looked like as of 8 PM this evening. My lovely grocery list was just cut up white paper stuck in a magnet along with the recipes I'm making for the week. I had to write out a new chore list weekly (the one with hooks fell apart as it was too heavy for the magnet I had it on). There was random magnets all over, artwork, Dr reminder cards, recipes, and much more. It was all just a mottled eye sore.


And then, tada! Now it's all color-coordinated. And organized.

So I made this recipe pocket to hold the recipes I want to make. The big pocket is big enough to hold full size printed or magazine pages. And the smaller pocket holds my standard 4x6 cards. All it is, is a 12x12 sheet of paper folded in half and then the last 3” cut off to create the front pocket. I decorated it a little with some ribbon and a stamp that I had lying around, it’s something anyone could do.I made a matching cup holder out of another sheet of the same paper and a box from those single serve water flavorings. Both are held to the fridge by little round adhesive magnets that you can get at Walmart for about $0.97.

I printed a free calendar off the internet and put all of the important events on there using a different pen for each person in the house (and stored them in my new pen holder). I also put a pencil in there for my new to-do/to-buy list that I got at Walmart for $4.00.

Zoe's new chore list is something I threw together in excel and then laminated with self sealing laminating sheets that I had left over from some previous projects. It is also held to the fridge by the adhesive magnets. Since its laminated I saved one of the magnetic dry erase markers that I had on the fridge and she can reuse that every week, just wipe and go.

The only magnet I left on my fridge is my flylady magnet to remind myself to begin each day FLYing... (if you want to know what that means check out www.flylady.net, she will forever change your life as she has mine).

Hope this helps and I would love to see the transformations of your fridge front. Feel free to share here or on my facebook page.

Side note: My fridge may have looked clean, and I would wipe it down weekly with a Clorox wipe, but I discovered just how dirty it was when I switched to a Mr Clean Magic Eraser today. I'm a little embarrassed to show this, but just had to share as it amazed me. The first is a new one, the 2nd was new before I cleaned my fridge front & sides.