Tuesday, November 29, 2011

Fake-It Febreze


I have come across a lot of recipes for homemade Febreze and this is the one I find works the best and is the simplest/safest to make. I changed the recipe to be able to refill my existing 32 oz Febreze Spray Bottle:

1/8 Cup of Your Favorite Fabric Softener
2 Tablespoons Baking Soda
Hot Tap Water - To Fill the Bottle to the Top

Shake it up and you're ready to go and fight those yucky odors!

Fake-It Cost Breakdown:


Fake Febreze ($0.15 or less for 1 oz Fabric Softener)

Total Fake-It Cost: $0.15 Each

Compare to Actual Febreze ($5.59 Each, seriously?)

Total Fake-It Savings: $5.44 Each*

*Let's say you purchase 1 Bottle of Febreze per month, that's a Savings of $65.28 per year!

Saturday, November 26, 2011

Organizing Measuring Cups/Spoons


Am I the only one who hates sifting through measuring cups/spoons only to find the one you need is missing? Well I decided to free up a drawer and make it so I can find what I need at a glance. I started with going through my cups/spoons and keeping one of each then washed down my baking cabinet door, added a few small 3M hooks and labels and am super happy with the results. My original thought was cup hooks, but I didn't want to damage the door, especially if I didn't get them in the right place the first time so 3M was the perfect option. I can't count how many places in my house have 3M hooks.

Friday, November 25, 2011

Repurpose - Salt Container

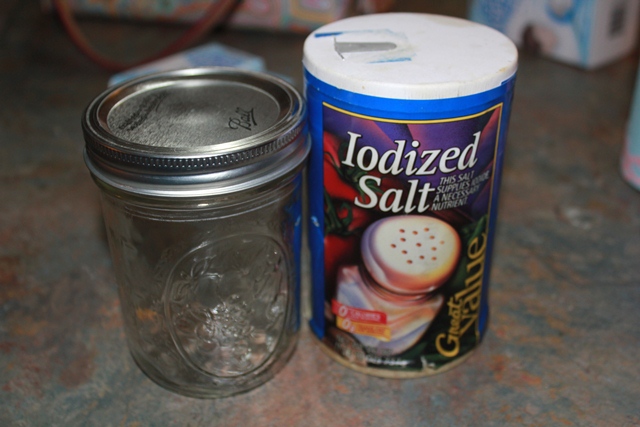
Have you ever had something you could buy in bulk, like sugar, but using it wasn't the easiest thing because of its size? Well you can re-purpose an empty container of salt to make your own pourable container.

Items needed:
'Ball' Canning Jar
Empty salt container
serrated knife/scissors

1. Cut the top off of the salt container
2. Remove the metal disc from the ball jar lid and replace with the salt top
3. Fill with product and screw on lid

Sunday, November 13, 2011

Semi-Homemade French Silk Pie

My favorite quick and easy version of French Silk Pie...

2 - 3.9oz boxes of chocolate fudge instant pudding
1/2 c. heavy whipping cream
2 1/4 c. milk
1 - ready made graham cracker crust
1 - 8oz container Cool Whip
1 - chocolate bar (Hershey works)


1. Whip pudding mix, milk & cream together using a standing mixer
2. Fill crust
3. Allow to set in refrigerator for 30 minutes
4. top with Cool whip and grate chocolate over top (just as garnish) using a zester
5. Place back in refrigerator for at least 3 hours
6. Serve & Enjoy

Any left overs must be refrigerated but there usually aren't any in my house

Monday, October 17, 2011

Puppy Chow Cupcakes


I made these for my daughters class to celebrate her 7th birthday. When I asked her what she wanted to take she just said Puppy Chow, well I wanted some kind of cupcake so I figured I would make a Puppy Chow Cupcake and also send a little snack bad of puppy chow for each child. Here is what I came up with:


Milk Chocolate Cake
Ingredients

2 cups sugar
1-3/4 cups all-purpose flour
3/4 cup HERSHEY'S Cocoa
1-1/2 teaspoons baking powder
1-1/2 teaspoons baking soda
1 teaspoon salt
2 eggs
1 cup milk
1/2 cup vegetable oil
2 teaspoons vanilla extract
1 cup boiling water

Directions

1. Heat oven to 350°F. Line cupcake tins.

2. Stir together sugar, flour, cocoa, baking powder, baking soda and salt in large bowl. Add eggs, milk, oil and vanilla; beat on medium speed of mixer 2 minutes. Stir in boiling water (batter will be thin). Pour batter into prepared cupcake papers, I use 1/4c put paper and it gives the perfect dome.

3. Bake 15 minutes or until wooden pick inserted in center comes out clean.

BUTTERCREAM ICING

Ingredients

6 cups confectioners' sugar (or more for consistency)
1 cup butter
2 teaspoon vanilla extract
2 tablespoons whipping cream
1/3 cup peanut butter

Directions

1.In a standing mixer fitted with a whisk, mix together sugar and butter. Mix on low speed until well blended and then increase speed to medium and beat for another 3 minutes.

2.Add vanilla and cream and continue to beat on medium speed for 1 minute more, adding more cream or powdered sugar if needed for spreading consistency.


Puppy Chow


Ingredients

9 cups crispy rice cereal squares
1/2 cup peanut butter
1 cup semi-sweet chocolate chips
4 tsp butter
1 1/2 cups confectioners' sugar

Directions

1. In a microwave safe bowl, combine peanut butter, chocolate chips and butter. Microwave for 30-45 seconds at a time on high stirring between until you have a smooth consistency.

2. Pour over cereal and stir until coated.

3. Pour powdered sugar into large plastic bag, add coated cereal and shake until well coated.


Assembling Cupcakes

1. Crush 1-2 cups of the Puppy Chow in a plastic bag.

2. Ice finished cupcakes with peanut butter icing, as soon as complete sprinkle crushed puppy chow over the top (don't wait too long or the icing will develop a hard 'film' and the puppy chow won't stick)

3. Place 1-2 whole pieces of puppy chow in the center of the cupcake standing up as a garnish.

4. Enjoy.

Sunday, October 16, 2011

Lots of Updates

I have made lots of updates in the last few days. My gallery now includes pictures of a few pages I made in 2009 and a page of photos of some of the hand made cards I've made. Take a look, and keep checking back because soon I will have the rest of 2009, 2010 and 2011 posted.

Monday, October 3, 2011

Easy, Reusable Chore Chart

I was looking on-line for some ideas on making Zoe a reusable chore chart, rather than printing one out every week. Well I came across this site www.accountablekids.com and liked the idea but didn't like the price or need all the other items that come with the kit (ADHD isn't our issue, we just needed a good chore chart, for parents with kids with ADHD I highly recommend the whole kit).

So I took the basic idea and made my own. This is the finished product.


Here are some of the cards, I used the same concept they did of the color bars at the bottom:


Altogether, this cost me about $10 to make. I used Excel to make the cards (using clip art) & printed them on card stock, then laminated them with Self-Sealing Laminate Pouches (I only used 4 of the 10 in the package), then bought a small key rack to hang them on and used a strip of adhesive magnet material I had in my craft center (or you could screw it to the wall, but the less holes the better for me).

Super easy, and good for the environment. Enjoy!