Sunday, December 30, 2018

My 12 Google Calendars

I'm a digital girl, all the way. We have been a paper-free house for nearly 3 years, no binders, no planners, no notebooks, etc. Today, let's talk calendars and planning. We'll touch on meal planning and such but I'll get more in depth in a couple weeks. 

Google Calendars are AMAZING! I have 12 of them. I know that sounds like a lot, and like it's hard to manage, but in reality it couldn't be easier. All 12 calendars are shared with my husband (including my personal one) with Edit access so we easily know what is going on with each other when trying to plan things.  In order, they are:

  1. Heidi Pope - my personal calendar for my appointments (doctor, hair, paydays, time off etc.)
  2. Activities - this is for anything and everything I have found within a decent driving distance (usually 30 miles) that sounds remotely interesting. This calendar is shared with about 2 dozen people (read only) in my area to share ideas about what is going on.
  3. Adam Pope - a calendar for my husbands appointments, work time off & paydays, this is actually his google calendar, but shared with me with edit permissions so I can add/edit things on his calendar as well as see what he has going on. 
  4. Budget - every bill we have due is on the calendar, this allows for a quick glance on when things need paid (even if it's on auto-pay) 
  5. Contacts - this auto-fills from my Google Contacts which I use for all the information about my friends/family to keep me on top of things. I'll share more about what all goes into my Google Contacts in a later post. 
  6. xxx Elementary - this calendar is for everything related to my daughters school. Days off, half days, PTO meetings, fundraiser information, special days (hat day, sports day, etc.) etc. I keep this separate from her calendar because I share this one with a number of other parents in my daughters class/school. 
  7.  Gwen - this is my daughters calendar for her appointments and after school activities.
  8. Heidi School - I'm still a full time college student so I use this calendar to track projects due, mid-terms, finals, start/end of semester, submission dates for reimbursement from work, etc. 
  9. Holidays - ALL holidays, both major and fun holidays (i.e. Dr Seuss' birthday, National Watermelon Day, etc.)
  10. Household - filter changes, loofa changes, regular home maintenance, etc.
  11. Meal Planning - Here I keep our meal plan, the calendar event not only includes the name but the recipe as well. Each month I'll look at the previous and drag and drop the event if I want to reuse it, or I will create a new one for new recipes.
  12. Reminders - this is for reminders that are created through Google Keep (a lifeline for me)
Having all the calendars open at the same time can be a lot to look at, but the great thing is you can turn them on and off for viewing. I usually keep meal planning, household, budget, and activities turned "off" for viewing because the reminders/notifications will still pop up, but I don't have to see them when I open my calendar unless I want to. This is my calendar with all 12 turned on:
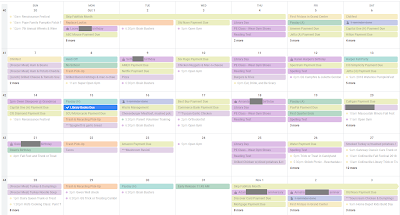


With only the "major" calendars on (those needed for new appointment decision making), it is much cleaner and less overwhelming.


One of the best parts of this, aside from it being super organized and easy to see just what you need, is that you always have it on you. Whether your phone, tablet, computer, or any other device you can access your calendar to look and update immediately. 

Some tips:
  • When making an appointment (like a follow-up with the doctor) put it on the calendar immediately, don't even take a reminder card from them, just put it on the calendar so you can't forget to put it on there later and you're saving paper (double win). 
  • While 12 calendars work for me, you may need more, or less, use what works for you. 
  • If you have multiple children, you'll want a calendar for each of them, as well as a calendar per school if you have kids at different schools. 
  • If you have animals, give each their own calendar or make 1 calendar for animals and before each activity put their name, i.e. "OSCAR - vet appointment" "LUCY - heart worm medicine" for quick understanding.
  • Changing the color of the calendar also allows you to see at quick glance who has activities planned for which day. 
  • Make sure you share your calendars with people who need to know what is going on, it's so much cleaner and easier than "inviting" them to activities. 
  • To create your additional Google Calendars, go to Google Calendars on a PC and click the elipses next to "Add Calendar" and select "New Calendar" 


Hope this was helpful for you! Check back soon for information on Google Contacts, Google Keep, Meal Planning, OneNote and other ways to be a "Working Supermom". 

Just remember, with planning and organization, you CAN do it all.

Thursday, October 17, 2013

Body Part Flash Cards

As another great way to learn body parts as well as get familiar with the way they are spelled and the writing for them looks I created some flash cards. Super simple and FREE for you to download.

Tools:

Body Part Flashcards
Heat Laminating Sheets
Laminator (I use my YourStory Binder)
Binding Ring
Scissors

Instructions:

1. Download the Body Part Flashcards here.
2. Cut out along the lines.
3. Laminate for longevity.
4. Punch a small hole for a ring in the upper corner.
5. Combine and play.


Just remember, with planning and organization, you CAN do it all. 

Wednesday, September 25, 2013

Scissor Practice (+bonus activity)

A fun activity for those beginning cutters to do. 

Instructions:

  1. Print the worksheet on colored or white paper/cardstcok.
  2. Cut out the long rectangles to make each scissor activity
  3. You could also print an additional set and laminate to use for a tracing activity for the little ones.
  4. Allow child to cut using child safety scissors, you may have to guide their hand the first couple of times but soon they'll be sipping along on their own.


Tuesday, September 24, 2013

Counting Objects 1-5

This is for older toddlers (3-4 years old), but a fun activity none the less, and even one you can work on with your 2 year old to begin learning counting basics. 

Instructions:

1. Print the counting game out on a colored printer (you can do black and white but it's not as much fun). One page will be for your board the other for the cards.  To download the worksheet, click the link below the picture

2. Cut the sheet containing the numbers to create cards.

3. Laminate the cards and the "board" (heat laminating works best)

4. Use adhesive Velcro dots to attach the cards to the sheets.

5. Allow to set for about an hour (full adhesiveness will not take effect for 24 hours)

6. 3-hole punch the sheet at the side (if you're going to put them in a 3 ring binder) 

7. Allow your little one to play. 

Monday, September 23, 2013

Coloring Books are EXPENSIVE (this is how you can REUSE them hundreds of times)

My daughter may only be 23 months old but she LOVES to color, and can go through an entire coloring book in one afternoon, and she only likes to color "name brand" ones (Umizoomi, Bubble Guppies, Spongebob, etc) which can range from $2-$8 each (and even if you print coloring pages, once you take into account the cost of ink and paper it can get up there as well). Well I discovered a way to save A LOT of money by buying one of each of her favorites and reusing them hundreds of times and all you need is:

3-ring binder
Page Protectors
Dry Erase Markers/Crayons

It's super simple. Break down the coloring book into individual pages or print off your favorite online coloring pages and place them in page protectors in a 3-ring binder. If you get one with the cover plastic you can place the cover of the coloring book in there and have a separate binder for each book (you can get 3-ring binders for $0.97 at Walmart, or $1 at Dollar Tree). VOILA!! You have a completely reusable coloring book. 

This also works great for those activity books because the kids can do the activities over and over again. It also allows for erasing mistakes. 

If your child is super proud of a picture you can just take it out of the binder and display it on the fridge in the page protector, and even take a picture of it to keep longer. 

Doing it this way will allow one coloring book to last years and even through multiple children. 

Just remember, with planning and organization, you CAN do it all. 


Friday, September 20, 2013

Toddler Learning Activity: Simple Sorting Activity (Busy Bag)

With how much my daughter loved her Animal Matching worksheet I wanted to make her something that would take her longer to complete. She also LOVES Umizoomi so I used a picture of each of the characters from a Google search to make some cards and sorting boxes Since the images are copyright protected I am not sharing the sheets I used, but if you pick your favorite pictures (from Google, clipart, or ever family pictures) and just Right Click-- Print -- then choose "Contact Sheet (35)" they come out the perfect size for both a fine motor activity and a sorting one. The sorting box was SUPER simple to make, I used 3 jewelry boxes I had lying around, stapled them together and glued a copy of each picture into the bottom. Then I put all the other cards into the baggie. She prefers to dump them out and sort, but it takes her about 20 minutes to get them all done.

Just remember, with planning and organization, you CAN do it all.


Thursday, September 19, 2013

Toddler Learning Binder: Animal Matching

I'm so excited to share these sheets I've made with you, and they are completely FREE to download. The instructions are SUPER simple, but will bring TONS of educational fun to your little one. 

Instructions:

1. Print 2 copies of each Matching game you want to create. One will be for your board the other for the cards. 

2. Cut one sheet to create cards.

3. Laminate the cards and the "board" (heat laminating works best)

4. Use adhesive velcro dots to attach the cards to the sheets, try not to cover the pictures as this will make it difficult for your little one to match them up. 

5. Allow to set for about an hour (full adhesiveness will not take effect for 24 hours)

6. 3-hole punch the sheet at the top (if you're going to put them in a 3 ring binder) 

7. Allow your little one to play. 

While playing identify each animal, make the sound and try to get them to mimic it as well. Some of the sheets that will be coming out later will also have the words incorporated to help them begin to identify the word with the animal, and then later still we will have just the words to match the animal. The great thing is you will only need to create new cards as the board can be reused with each set. To download the worksheet, click the link below the picture.

**UPDATE: I have built the pages below to now include the picture, the pictures with the words, and then a final sheet with just the words. 

Just remember, with planning and organization, you CAN do it all.