Saturday, January 26, 2019

Managing Your Inbox Using Gmail Categories

Does your email inbox look like this:


If not, you may have a little work to do. Periodically I go through the preassigned categories that Gmail has and mark everything "Not Social/Updates/Forums/Promotion" so that I can handle the items myself and put them where I need them. Using Gmails Categories feature you can keep all the emails you need to, keep them easily filed in your email and still keep your inbox clean. You can even have subcategories to keep things bundled together and separate at the same time (I use this for my favorite bloggers). 
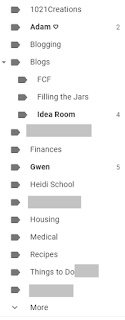
Every time an email comes in I remove the inbox category and add my own to it, then my inbox stays clean and I'm able to manage the items. As items are no longer needed in my inbox (i.e. I've paid the bill, responded, etc) I either delete it if I'll never need it again, or I print it to OneNote (we'll get into my OneNote organization deeper in another post) and keep a copy there, deleting it out of my inbox. Things like blog post newsletters I rarely delete as I reference back to them regularly. 

Make sure you're regularly checking your spam folder too, because gmails spam filters are a little stingy. For a few weeks I went in and marked everything "Not Spam" so it would come into my inbox and I could process it properly (marking it spam if needed) and I still go in from time to time to ensure everything in my spam box is truly spam. 

Also, make sure you're emptying your spam folder and trash cans regularly, Gmail automatically does it, but it's nice to not see numbers down the side, almost as nice as laying on clean warm sheets when you go to bed. 

Just remember, with planning and organization, you CAN do it all.

Wednesday, January 9, 2019

Taco Pasta Recipe

I let Gwen have input on dinner most nights and she wanted tacos last night, while this worked for her and my husband I wanted something a little different so I decided to try and make a taco pasta. It came out delish so I decided to share my recipe with all of you. This is a very loose recipe, adjust as you see fit and to your families tastes.

Ingredients

1/2 lb shell pasta
1/4 lb 93% ground beef
1/2 c chunky salsa
1c shredded Mexican cheese
1/2 c taco seasoning
1/4 c water

Cooking Directions

1. Cook pasta according to package directions (or however you normally cook pasta) until just barely done, drain and set aside.

2. In the same pot brown ground beef and then add taco seasoning and water and simmer until nearly all water has evaporated.

3. Add the pasta back to the pot and stir in salsa and cheese. If the heat from the meat and pasta doesn't melt the cheese completely you can turn the heat back on for a few moments but not too long so that you don't overcook the pasta.


This was a great dish and even reheated well the next day, which is saying something since in my family we never eat leftovers since I'm not a fan of how things taste reheated. 

If you give it a try leave a comment below and let me know how you liked it. 


Just remember, with planning and organization, you CAN do it all.

Tuesday, January 8, 2019

Reading Tracker

My daughters school has literacy nights where they ask us to bring in a list of all the books they have read over the last month. Well anyone who knows me knows I don't like boring when I can have cute, so I made this reading tracker for her and wanted to share with everyone.


I printed the pages, punched them and placed them in a 3 ring binder. It's the perfect size to keep on the book shelf next to her books so we always remember to fill it in.

Each month has a pretty header and room for 100 books (that's over THREE each day). On the last page each month is this:


The special prize is up to you, for my daughter it's a full "Mommy/Daughter Day" where she gets to pick everything from the foods all 3 meals, to where we go and what we do.

To download the Reading Tracker click here. 

Enjoy and happy reading!!

Just remember, with planning and organization, you CAN do it all.

Monday, January 7, 2019

Pineapple Upside Down Cake Cups

I was craving something sweet and really wanted cake but am out of powdered sugar so I had to think of a cake that didn't need icing, or an icing alternative and then remembered how amazing pineapple upside down cake is. I looked up my moms recipe and saw the cake took 45 minutes to cook and at 7:30 p.m. I did not want to wait that long plus cool time to indulge so I decided to make mini-cakes using my jumbo cupcake tin from Wilton.

Ingredients

For the topping:
1 stick of butter
9 TBL brown sugar
1 can pineapple chunks
9 maraschino cherries

For the cake: 
2 cups AP flour
1 1/2 tsp baking powder
1/4 tsp salt
1/2 c salted butter softened
1 1/3 c brown sugar
2 large eggs at room temperature
2 tsp vanilla paste
1 cup whole milk


Instructions


1. Preheat oven to 350° F.

2. Spray a jumbo muffin tin with cooking spray and set aside.

3. Add the butter and sugar from the topping section to a small saucepan over medium heat and heat, stirring constantly until the butter is melted and the mixture is completely smooth. Remove from heat and distribute evenly between the 9 cavities of the jumbo tin (may also work in a standard 12 cupcake tin).

4. Take pineapple chunks and cut in half keeping the core intact, lay 6 pieces in a circle on top of the butter and sugar mixture. Place a maraschino cherry in the middle.

5. In the bowl of a stand mixer mix the butter and sugar from the cake ingredients until light and fluffy, the more air you get in now the lighter your cake will be (skipping this step will cause a dense bread like cake). 

6. Add in the eggs and vanilla paste (extract will work as well) and mix well after each ingredient. 

7. Add the dry ingredients in thirds alternating which ingredient you're putting in, mixing each time just until combined. 

8. Evenly distribute the batter among the 9 cavities. 

9. Bake at 350°F for 18-20 minutes or until a toothpick inserted comes out clean. 

10. Remove from the oven and allow to cool for 5 minutes. Then run a butter knife along the outer edges to loosen them from the pan, place an upside down wire rack on top and flip over onto a cookie sheet lined with a silicone baking mat (or parchment paper).

11. Allow to cool a little more and enjoy. Serve as is or with a little homemade whipped cream. 
Just remember, with planning and organization, you CAN do it all.

Thursday, January 3, 2019

Google Keep - Google's Best Kept "Non-Secret" Secret Weapon

I love checklists, but I hate paper checklists because I like to reorder things and add sub-items and just have more control than paper gives me. Recently while watching a YouTube tutorial for something completely unrelated, the YouTuber mentioned Google Keep. I hadn't heard of it so I Googled it (Google really is taking over the world). Google Keep is so much more than just a place to house your checklists, but it is a great place for them. 

I have my grocery list in Google Keep and I can share it with my husband so he can add items, see what is on there, check things off if he's shopping without me, etc. It's AMAZING! I also have a list of my daughters favorite items for her school lunches, because as you know I make her lunch every day and try to give her variety. There are some other check lists too, like Resolutions/Goals, a long term project list, a list of all the switches that still need changed to smart switches. 

It also has reminders in it that sync with your Google Calendar which is huge with how much I use my Google Calendars. *If you missed that post check it out here: My 12 Google Calendars* With Reminders, you can geotag them which is amazing. Put the address of a place you need to stop (i.e. picking up dry cleaning or a prescription) and if you're within half a mile of that location, the reminder will pop-up to complete the task. 


You can access Google Keep from your phone or your computer or any smart device. I only just learned about Google Keep three months ago, so I'm still learning about all the fun features available, but check it out, it will change your life. 


Just remember, with planning and organization, you CAN do it all.

Wednesday, January 2, 2019

School Money Stickers (Free Printable)

If you're anything like me, you feel like you're sending money to school 3x a week and can't always remember to put all the information needed on the envelope with it. Usually the school will still take it, I mean who wouldn't accept money, but then they send the reminders home of "please include the following information when sending money". So what I did was create this cute little infographic that I printed out on sticker paper and attached to the front of a few envelopes to keep on hand.

Of course I can't create something without sharing it with you guys.


Click here for a pdf file with 4 graphics per sheet. You can print them on sticker paper, or just on regular paper and then tape them to the envelopes.

Just remember, with planning and organization, you CAN do it all.

Tuesday, January 1, 2019

Completely Using Google Contacts

I feel like I'm giving away one of my biggest organizing/networking secrets, but it's so exciting I have to share. 

Google Contacts is an amazing feature that is so often underutilized by Google users. You can store more than just the basic name and phone number which helps not only with keeping the information at your fingertips, but making your brain more efficient since you don't have to remember certain things when shopping for gifts or planning for topics in networking meetings. 


I have created a fake contact to the left, but the information looks very similar to what I have for every contact in my phone. 


  1. Always include a picture, this helps you to put the name with the face, especially if a majority of your contact is over the phone/email you want to be able to easily recognize the person when you see them in person. Also, make sure it's just a picture of them, having other people in the picture can be confusing. 
  2. Include their company and job title. If you know their middle name, include that too. 
  3. Always label the phone numbers properly so you don't mistakenly call their personal number when you were trying to reach their office. 
  4. Make sure if you list an address, which is a great idea especially when it comes time to send Christmas cards, you have the full address including zip code. 
  5. There is also a section to list relatives. There are 2 ways you can do this, you can link people in they're both in your phone, for example, my married neighbors are both in my phone under separate contacts, but are linked through the relatives option. If you don't have the information you can just list their names and relationship in the phone. I also add birth dates next to the names if I find them out in passing conversation. Even if you just have the month/year that's helpful to use as a conversation starter, or just the age and approximate year to help with relating topics to them. 
  6. Always include any dates you have, birthday, anniversary, work anniversary, etc. Anything that is special to them. 
  7. Finally, the most important section in my opinion, is the notes section, here I make notes about things the person likes, doesn't like, favorites, etc. If it's a close friend I'll do the same for their children in the notes section (clothing sizes, current likes, etc.). In the example above, John is  a Ford fan, but hates Dodge, loves Star Trek and the Raiders and his favorite food is candied bacon. Anytime I have a conversation with someone and likes/dislikes or hobbies come up I try to make a mental note to add it to their contact note in google so I have it for later reference and don't have to try to remember it. 
One great thing with the dates section is those will automatically transfer over to your Contacts Calendar that was discussed in my post on My 12 Google Calendars

Just remember, with planning and organization, you CAN do it all.